Pattern: Simplicity 3573 Nightgown

Date Sewn: 08/07/2020
My measurements at the time: High bust 36/Bust 38.5/Waist 32/Hip 46
Size used: M for the bust/waist and XL for the hips. My measurements put me into a Large for the bust/waist but Big 4 patterns usually have a ton of ease so I sized down on top by 1 so it wouldn’t be so big. In retrospect, I should have left it at the Large size as it is just a tiny bit too tight when I move my arms forward. So for this pattern, use your correct size

Alterations: I lengthened the bodice by 1” because the other photos reviews of this looked like the top hit at a weird spot in the middle lower bust and I didn’t want to feel a seam across the lower part of my bust. I’m glad I did add that 1” because I feel like it hits the perfect spot now. I also did my usual 1/2” forward shoulder adjustment and this time I did a 1/2” round back adjustment because my quick tissue fit of the top showed I needed it.

Instructions: They are good. I read some people having problems with the steps for the top button placket and neck facing sewing. I took step by step pictures of that to show how I interpret the instructions to say how to do it. I will include that below. The pattern states “for interfacing” on the top but doesn’t’ say to add any interfacing. Since buttons go there, I did add featherweight fusible interfacing just to that edge. Because I added this interfacing I didn’t need to baste on step 2 to fold it again. The rest of the instructions went just fine.

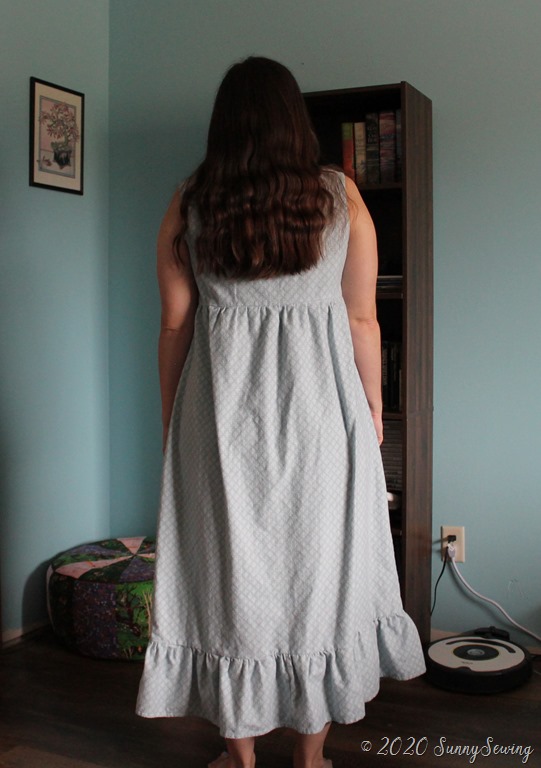
Fabric: I actually cut up a king size flannel sheet that I bought last year on clearance to use for pajamas.. Sometimes this is a great way to get a lot of fabric for cheap! I measured all the cut pieces after and see I used 3.5 yards of fabric for this if it was 44” wide. The pattern calls for 3 3/8 yard so this is spot on.
The buttons I used are some from my Grandma. I only have a small jar of her buttons so they are special to me. Actually this whole nightgown reminds me of her. She wore a lot of them in this style. I miss her ❤

Thoughts: I have been wanting to sew this pattern since my 2014 summer sewing plans. I dreamed this nightgown in a flowy swiss dot, but I don’t have any of that in my stash so I thought a nice cozy flannel nightgown would be great. My husband and daughter made fun of me saying this is a tent and not a nightgown. I like it though. I think it will be soft and comfy to wear when fall comes around. It is big and roomy, but the flannel makes it heavier so it is meant to be this way. If I made it in a soft lawn or that swiss dot It would still be flowy but less roomy looking. I do wish there were more ruffling/gathers on the bottom ruffle and where the skirt attaches to the bodice. Other than that I like it a lot!

Here is how the top is laid out. the farthest right rectangle is the “interfacing” part. Then you have the middle rectangle and a far left line for buttonholes.

Fold the interfacing far right rectangle to the bottom side.

Now fold it BACK to the TOP along the other line that says “fold line for facing”; sort of like an accordion. The instructions make it seem like you fold this under and then over but you don’t. You just fold the interfacing back onto the facing. Baste this.

Now fold open the bias tape and attach it to the neckline overlapping the folded back front placket by about 3/4”. sew along the first fold in that bias tape about 3/8” seam allowance.

after you sew the bias to the neckline (not sewing over the placket area), fold the bias up like normal bias and then flip it down once so that it doesn’t show on the frontside of the bodice. Then flip the placket back to the right way.

stuff the bias tape into the placket hole and press the placket over it all nice and flat. (I didn’t make my bias long enough here to go all the way into the placket hole).

topstitch all around the neckline.

view from inside.

view from the outside. I sure hope these steps help someone!
Thanks for reading!
Kristin
Discover more from SunnySewing by Kristin
Subscribe to get the latest posts sent to your email.

[…] View A (bottom right) – finished and blogged! […]
LikeLike
[…] Simplicity 3573View A (bottom right). Fabric: I’m thinking a light swiss dot in the greenish color shownFinally sewn Aug 2020!! […]
LikeLike